Learn how to connect your Holidu property to SIBA (Sistema de Informação de Boletins de Alojamento) for seamless online guest registration and automated data submission to Portugal's local authorities.
Context
Holidu simplifies the guest registration process for property owners in Portugal by integrating directly with the SIBA portal. This integration allows you to collect guest information automatically and submit it to the responsible authorities, helping you comply with Portugal's local registration requirements. With this feature, guests receive registration forms via email after booking and can complete their details digitally, streamlining your check-in process.
1. Before You Start - What are the prerequisites?
Before activating the guest registration feature with Holidu, ensure you have the following in place:
SIBA Portal Registration
You must have an active property registered on the official SIBA portal at https://siba.ssi.gov.pt. If you haven't registered yet, complete this step first.
Required SIBA Credentials
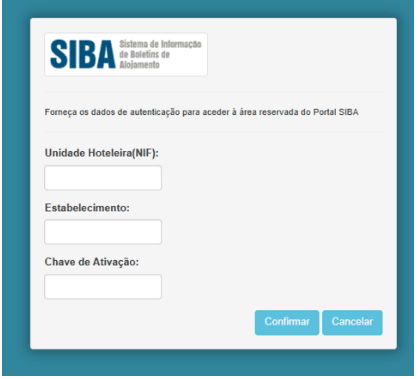
Gather the following information from your SIBA portal account:
- NIF of the Hotel Unit (Unidade Hoteleira)
- Establishment Code (Código do Estabelecimento)
- Authentication Key (Chave de Ativação) - typically a 12-digit password
These credentials are the same ones you use to log into the official SIBA Portal.
Know Your Submission Method
Identify which bulletin submission method (Método de envio) is currently active in your SIBA portal account. Holidu supports two methods, and the one you select in Holidu must match exactly what is configured in SIBA:
- SEF-SIBA web service integration
- SEF-SIBA Página no portal integration
To check your current submission method:
- Log in to your SEF account at https://siba.ssi.gov.pt/s/an/default.aspx
- Navigate to Atualização dos dados de inscrição (Update registration data)
- Note the Método de envio (submission method) displayed
If you need to change the submission method and cannot do it yourself, contact SIBA directly at https://siba.ssi.gov.pt/contactos with your NIF and establishment numbers.
2. How to configure the Guest Online registration between Holidu and SIBA
Step 1: Access the Online Check-in Settings
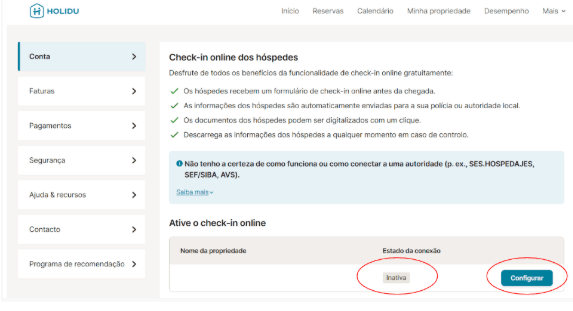
In your Holidu app, navigate to Tools in the left-side menu and click on Online Check-in.

Step 2: Select Your Property
You will see a list of all your properties. Click Configure next to the property you want to connect to SIBA.
Step 3: Fill in Your Information
Complete the form with your information and credentials from the SIBA Portal. Make sure to enable the toggle for Send data automatically to the responsible authority.

Step 4: Select Your Submission Method
Choose the sending method that matches what is currently configured in your SIBA account. This is critical - if the two do not match, validation and data transfer will fail.

Option A: SEF-SIBA Web Service Integration
Use the same credentials that you use to access the SIBA portal at https://siba.ssi.gov.pt/S/FB.aspx.
Fill in the following fields:
| Field in Holidu app | SIBA portal field |
|---|---|
| Username | Unidade Hoteleira (NIF of the hotel unit) |
| Password | Chave de Ativação (activation key) |
| Establishment number | Estabelecimento (establishment code) |
For the remaining fields - postal code, postal area, contact name, email and phone number - enter exactly the same information that appears in your SIBA account under Atualização dos dados de inscrição at https://siba.ssi.gov.pt/S/au/DadosIdentificacaoActualizacao.aspx.
On the same SIBA page, verify that Método de envio is set to Web Service for this option to work correctly.
Option B: SEF-SIBA Página no Portal Integration
Use the same credentials that you use to access the SIBA portal at https://siba.ssi.gov.pt/S/FB.aspx.
Fill in only the following three fields:
| Field in Holidu app | SIBA portal field |
|---|---|
| Username | Unidade Hoteleira (NIF) |
| Password | Chave de Ativação (activation key) |
| Establishment number | Estabelecimento (establishment code) |
No address or contact details (postal code, postal area, contact name, email, phone number) are needed for this option. Only select this method if it matches the Método de envio configured in your SIBA account settings, which you can verify under Atualização dos dados de inscrição.
How to Switch Between the Two Methods
The submission method selected in Holidu must always match the Método de envio in your SIBA account. Changing it in Holidu alone is not sufficient - you must request the change from SIBA.
- Check the current method in the SIBA portal under Atualização dos dados de inscrição at https://siba.ssi.gov.pt/S/au/DadosIdentificacaoActualizacao.aspx
- If you need to change it, gather your NIF (Tax Identification Number) and the establishment number(s) of every property that needs the change
- Send an email to siba@ssi.gov.pt requesting the change of submission method (for example, to Web Service)
- Wait for SIBA's confirmation that the change has been processed
- Once confirmed, return to the configuration form in your Holidu app and select the matching sending method
- Complete the required fields for that option and click Validate
- Once the validation shows Completed, click Save Changes
Step 5: Validate and Save
Click Validate to confirm your connection. Once it displays Completed, click Save Changes. Your connection is now active.

3. What happens after the activation
After you successfully activate the SIBA connection, the following process begins automatically:
Automatic Form Association
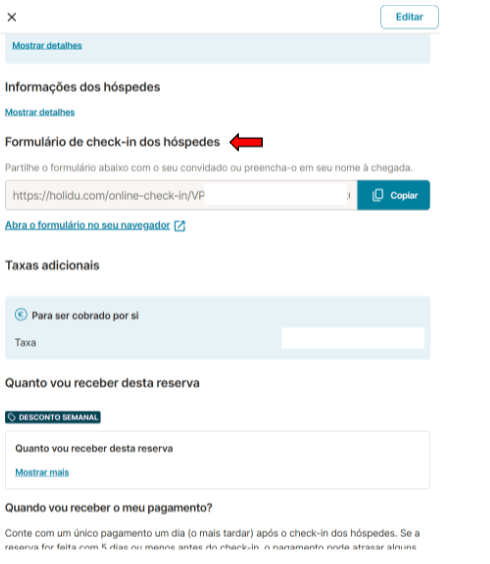
Any future bookings with a check-in date at least 6 days after your configuration is completed will automatically be associated with a guest registration form.
Guest Notification
The registration form is sent to your guests via email or through your booking channel's messaging system (for example, Airbnb message if booked through Airbnb).
Important Timing Note
Bookings made before you complete the SIBA configuration will not automatically receive the form unless the configuration was completed at least 6 days before their check-in date. For these bookings, you must manually submit guest data to SIBA.
4. Guest's point of view
Understanding the guest experience helps you guide them through the process if they have questions.
After Booking
Guests receive a form link via email or booking channel message immediately after confirming their reservation. They are asked to provide details for all guests, including children.
Completing the Form
Guests have two options for entering their information:
- Fill out the form manually by typing their details
- Scan their ID documents to auto-populate their information


Reminders and Data Submission
If a guest does not complete the form, automatic reminder emails are sent 5 days before their check-in date. If the form remains incomplete on the check-in day, you can use the same link to manually collect the information from the guest.
The guest data is automatically sent to the SIBA portal after 11:00 PM on the check-in date, so all information must be completed by that time for successful submission.
5. Form Statuses
Monitor the status of guest registration forms for each booking in your Holidu app. Understanding these statuses helps you identify any issues that need attention.
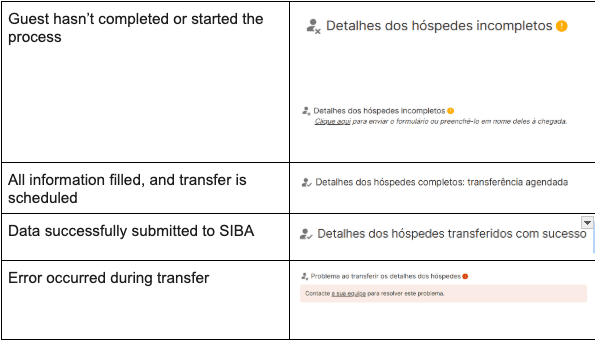
Common Form Statuses
Do you want to contact us?
We’re here to help. You can contact us directly if you need assistance or have questions.
Contact us