How to Connect Your Booking Website to Your Own Domain
Already have a domain you want to use? You can connect it to your Holidu booking website to drive more direct bookings under your own brand. This comprehensive guide will walk you through all the steps needed to successfully connect your own domain to your Holidu website.
Before You Start
Before beginning the domain connection process, make sure you have the following:
- Access to your domain provider's settings (such as AWS, Vercel, GoDaddy, Namecheap, or similar platforms)
- Administrative access to your Holidu host account
- Basic familiarity with DNS settings (don't worry if you're new to this—we'll guide you through each step)
Important note: If you already have a website live on that domain, it will be replaced by your direct booking website once this process is complete. Make sure this is the domain you want to use before proceeding.
Step-by-Step Guide to Connecting Your Domain
Step 1: Start the Process in the Holidu App by Setting Up Your Booking Website
The first step is to enable and configure your booking website within the Holidu platform:
- Log in to your Holidu host account
- Click Enable website if it is not enabled yet
- Click Connect my domain

After you start the setup and enter your existing domain name, a DNS tab will appear with specific DNS values that Holidu has generated for you.
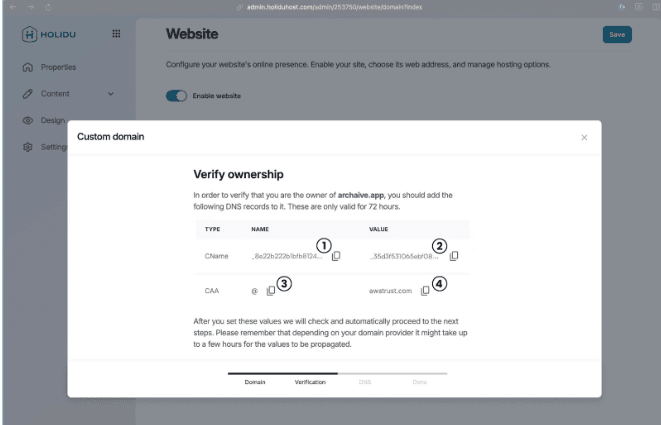
What to do next: Copy these DNS values carefully. You'll need them to add records in your domain provider's settings in the following steps. Don't worry if you're not familiar with DNS settings—we'll guide you through each value you need to add.
Step 2: Create a New CNAME Record in Your Domain Settings
A CNAME (Canonical Name) record is the first DNS record you'll need to create. Here's how to do it:
- Log in to your domain provider's control panel
- Look for the DNS settings, DNS management, or DNS records section
- Click the option to create a new record or add a DNS record
- In the record creation form, follow these steps:
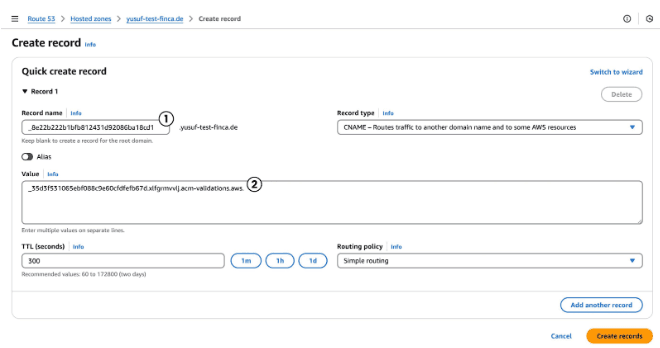
- For Type, select CNAME
- In the Holidu app, find the CNAME line and copy the "NAME" value (marked as 1 in the example below)
- Paste this value into the name field of the record you're creating in your domain provider
- Next, copy the "VALUE" from the same CNAME line in Holidu (marked as 2 in the example below)
- Paste this value into the value field of your domain provider's record
- The TTL (Time To Live) and Routing policy fields can usually keep their pre-filled default values
Once you've entered all the information correctly, create the record in your domain provider.
Example (AWS):
Important: If there are already DNS records saved for the domain you want to use, you must delete those first. This will disconnect your existing website from the domain, so it will no longer be accessible to guests. This step is necessary so you can connect the domain to your new direct booking website.
Step 3: Add a CAA DNS Record in Your Domain Settings
A CAA (Certification Authority Authorization) record is important for SSL certificate validation. Here's how to add it:
- In your domain provider's control panel, create another new DNS record
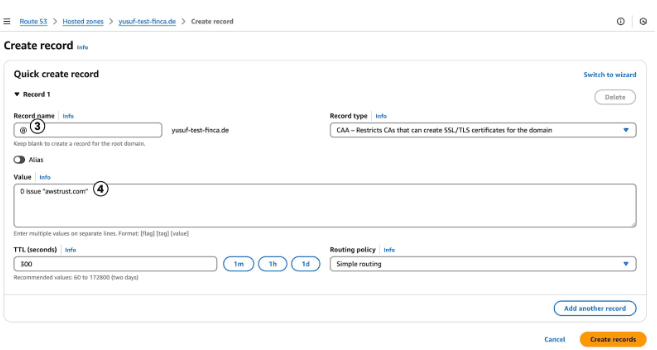
- This time, select CAA for the record type
- In the Holidu app, find the CAA line and copy the "NAME" value (marked as 3 in the example below)
- Paste this into the name field of the record you're creating
- Copy the value from the Holidu app (marked as 4 in the example below)
- Paste this into the value field of your domain provider's record
Special formatting note: Some domain providers require a special format for the value field. For example, you might need to format it as: 0 issue "letsencrypt.org". In this case, add the value from Holidu within quotation marks. Your domain provider should indicate if special formatting is needed.
- The TTL and Routing policy fields can usually keep their pre-filled default values
- Create the record once you've entered all the information
Step 4: Head Back to the Holidu App to Check That the Records Are Recognized
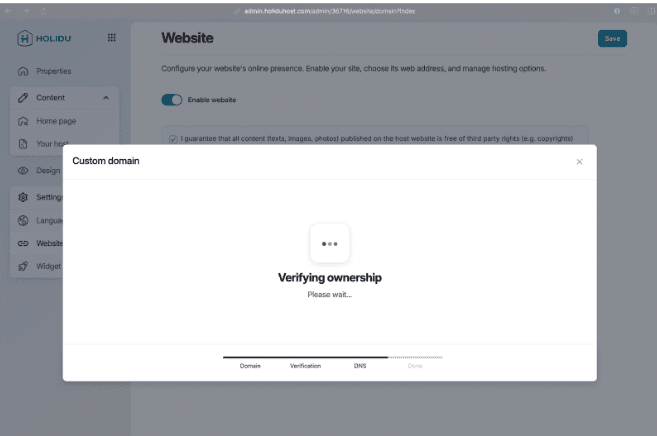
Now that you've added the CNAME and CAA records to your domain provider, Holidu will automatically check your DNS settings.
Timeline: This verification process typically takes around 5 minutes, but can sometimes take up to 30 minutes depending on your domain provider and DNS propagation times.
Return to the Holidu app and wait for the verification to complete. If everything looks good, your domain will be verified and you'll be guided to the final configuration step.
Tip: If verification is taking longer than expected, this is often due to DNS propagation delays. DNS changes can take up to 48 hours to propagate worldwide, though it's usually much faster. You can check the status of your DNS propagation using online DNS checker tools.
Step 5: Add an ALIAS DNS Record in Your Domain Settings
Once Holidu has successfully verified your domain, there is just one more DNS record to add. This is the final piece needed to complete the connection.
Holidu will provide you with specific ALIAS values to use:
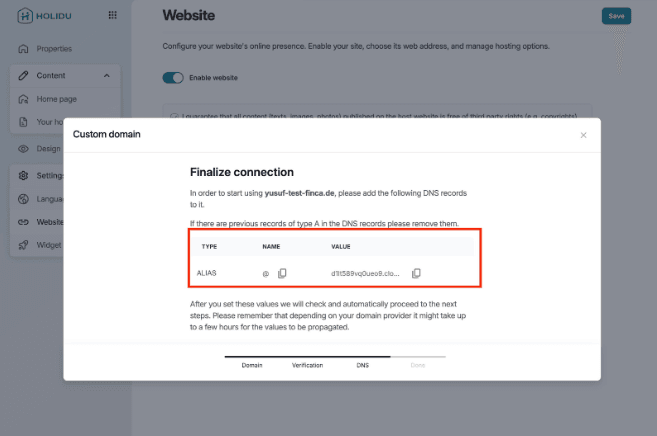
Follow these steps to create the ALIAS record:
- Return to your domain provider's DNS management section
- Create another new DNS record
- Change the Type to ALIAS (also called ANAME on some providers)
- Enter the values provided by Holidu in the appropriate fields
- Create the record
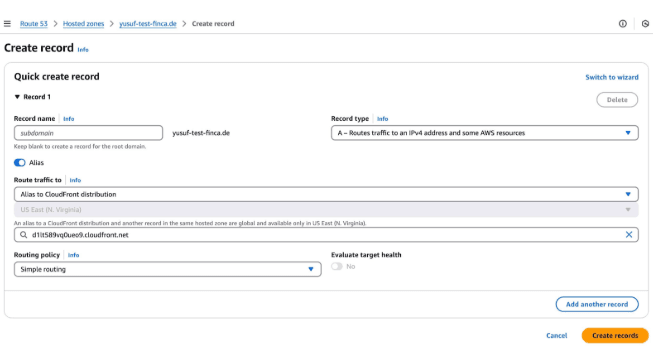
Before moving to Step 6, verify that your domain provider settings now include all three of the following records:
- CNAME record (created in Step 2)
- CAA record (created in Step 3)
- ALIAS record (created in Step 5)
All three records are required for your direct booking website to connect properly to your domain. If any are missing, your website may not load correctly.
Step 6: Final Verification
You're almost done! The final step is to confirm that everything is working correctly.
- Return to the Holidu admin dashboard
- Wait for the final domain verification to complete
- Once verified, you'll receive a confirmation notification
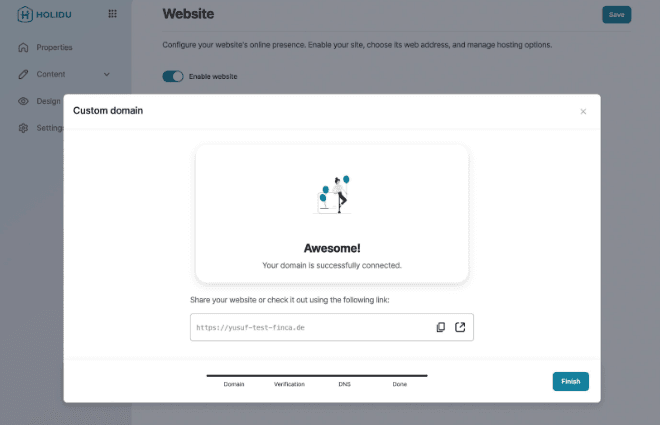
Success! You can now access your direct booking website by visiting your own domain. Your booking website is now live and ready to accept reservations under your own branded domain.
Troubleshooting Common Issues
DNS Records Not Being Recognized
If Holidu is not recognizing your DNS records after 5 minutes:
- Double-check that you've copied the NAME and VALUE fields correctly from the Holidu app
- Verify that there are no extra spaces or special characters in your entries
- Make sure you're editing the correct domain in your domain provider
- Wait a bit longer—DNS propagation can take up to 48 hours
- Try clearing your browser cache and refreshing the Holidu app
Website Not Loading After Verification
If your domain is verified but your website isn't loading:
- Confirm that all three records (CNAME, CAA, and ALIAS) are present in your domain provider
- Check that no conflicting DNS records exist for your domain
- Allow 15-30 minutes for DNS changes to fully propagate
- Try accessing your website from a different browser or device
Unsure About Your Domain Provider's DNS Interface
Different domain providers have slightly different interfaces. If you're unsure how to access your DNS settings:
- Log in to your domain provider's control panel
- Look for sections labeled "DNS," "DNS Management," "Domain Settings," or "Advanced DNS"
- If you can't find it, consult your domain provider's help documentation or contact their support team
- The Holidu support team can also help guide you through the process
Summary
Connecting your own domain to your Holidu booking website is a straightforward process that involves adding three DNS records to your domain provider. By following these six steps, you'll have your direct booking website live under your own branded domain in no time.
Remember, the key is to carefully copy the DNS values from the Holidu app and paste them correctly into your domain provider's settings. If you encounter any issues during the process, the Holidu support team is available to help you get your domain connected successfully.
Once your domain is connected, you'll be able to promote your booking website with confidence, knowing that guests are booking directly through your own branded domain—helping you build your brand and maximize direct bookings.
Do you want to contact us?
We’re here to help. You can contact us directly if you need assistance or have questions.
Contact us